
Road/Race Set-up and Tuning Method
Where do you start when a new suspension adjuster setting is needed? The following method will give you the “first big step” in getting to a baseline setting.
From here you can begin to fine tune set-up.
Fully Extended
Fully Extended Imagine this, if you hold up at eye level in your right hand the soft setting and then in your left hand do the same for the firm setting, somewhere in between is
the right setting. The important thing to achieve is an estimate in between these two extremes, 80% correct for your baseline settings is an excellent result. From
here you can begin to fine-tune your set-up.
TO BEGIN:
use these guides for a static or in the garage test:
1st set spring sags (preload)
(see diagrams and instructions below) the most important one is with you on the bike. The spring can be set anywhere that produces the right result on the day. N.b.
Bike sag is very dependent on fork condition – if you wish to use bike sag, please advise us of your final sag reading and we can discuss details 03 9560 2770
Use a tape measure and/or cable tie, be sure not to bounce and push the tie down too far (note forks can be sticky so don’t worry about slightly different readings).
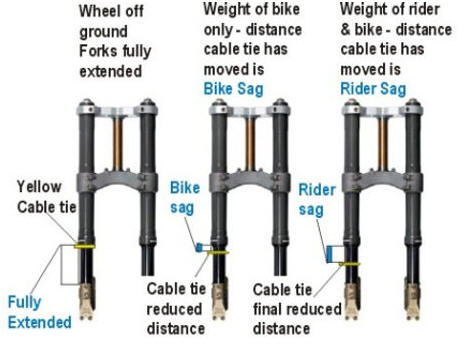
Fully extend the forks with the wheel off the ground and do not use a fork stand. Place a cable tie around fork leg, slide against the rubber dust scraper
Bike Sag
Lower the bike and then lift again to fully extended position.
The first distance that the cable tie has moved on the fork is
Bike Sag
Rider Sag
Get on bike with both feet on pegs in the normal riding position (get help
or elbow the wall).
The second distance cable tie has moved is
Rider Sag
Front Rider Sag Range:
Rider Sag Range: between 25% to 33% of total wheel travel (use these figures as a guide only, test-riding will clarify the result)
25-45mm depending on specs of your bike. Check your manual for exact specifications Race bikes can be less than 25mm
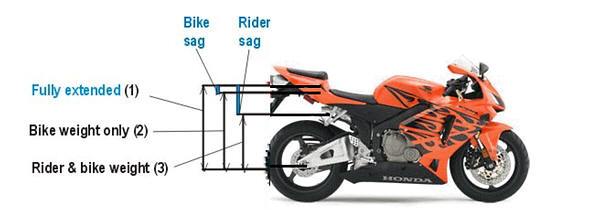
Fully extend the rear suspension with the wheel off the ground. Do not use a swingarm stand. Measure vertically up from the rear axle to a convenient point on the bodywork or
use masking tape. This is the fully extended measurement
Bike Sag
Lower bike with wheel on ground. Measure to the same mark.
The reduced distance is
Bike Sag
#1 minus #2
Rider Sag
Get on bike with both feet on pegs in the normal riding
position (get help or elbow the wall).
The second distance cable tie has
moved is
Rider Sag
Rear Rider Sag Range:
Check bike manual for your bike’s rear ‘total wheel travel’ Rider Sag Range: between 25% to 33% of total wheel travel
2nd set the rebound
a bounce test will give you a close approximation.
Front: hold and keep the brake on push down hard at least half travel and watch how the bike rebounds, no bounce when it stops is o.k.
Rear: it's similar for the rear only look for a uniform rate of rebound without being too fast, you don't need the brakes on.
3rd set the compression last
it is difficult to feel compression settings without riding the bike, I would prefer them to be soft at the start
WHEN
you have satisfied yourself that the above static tests are o.k. the next step is to set the damping range.
* warning *
Never use all the way in nor all the way out as a setting – this
is dangerous. When adjusting the compression and rebound adjusters, fork and shock, you turn them all the way in to full firm (that is zero), then count
turns or clicks out for your setting
HOW
The next step is to
set the range for the compression and rebound adjusters, you
need to think differently here, initially you are looking for
two wrong settings and
this is the way to set your range. You need to find the maximum soft setting and the maximum firm setting
If you use our first setting and for example this is soft (the first ‘wrong’ setting) the next step is to find the firm setting (the second ‘wrong’ setting) these two
settings are to find your range.
You now have two extreme settings that you don’t want to use again but this method has taught you:
Isolating the functions of spring, rebound and compression will give you clear messages on where your settings should be. Test ride after each individual change to
assess the effect before moving onto the next step.
# 1. Springs
Check the preloads, check the sags (see diagrams above) And if they’re correct, the next two steps involve setting DAMPING. Damping is the use of oils and their properties to
absorb the energy that would otherwise cause the springs to react uncontrollably when they bounce back. NEXT......
# 2. Rebound damping
You can ignore compression settings at this stage. When you go over a bump, the spring compresses exerting some force pushing the tyre into the ground. When the bump
doesn’t compress the spring any more, it rebounds. You must control the return rate of the spring first because the spring and rebound combination is what gives you
stability. Use the above soft/hard and in-between setting method to find the 80% baseline setting. The NEXT step is…....
# 3. Compression damping
When the spring and rebound settings make the bike stable, you can then progress to compression settings to control the feel of how you travel over bumps. Use the same
soft/hard and in-between method to find the 80% baseline setting.
This is the FIRST BIG STEP
– fine-tuning begins after you do this. NEVER try to see how fast you can go without the bike being fully set-up. Progress slowly. With Baseline
settings you will then be able to fine-tune for settings to best suit the conditions on the day, e.g. hot, cold, wet, dry, and changes in terrain and track used.
Tuning System Overview:
Displacements
suspension
Bike body and Rider are “suspended” between two oscillatory systems (i.e. both ends bounce)
system
A “system” is a set of independent but interactive elements that form a unified whole
damping
is any effect that reduces the amplitude of oscillations in the system (adjusters fine-tune the system)
damping elements
include spring rate, suspended weight, hydraulics, geometry, shimstacks, pistons, valves, design
springs
support the weight of bike and Rider, store and release energy
spring purpose
is to compress almost fully and return to free length without change to its initial properties
sag test
will give an indication whether or not spring rates are suited to the suspended weight
bounce test
indicates whether compression and rebound damping is operating effectively with bike weight
preload
spring is compressed with a load before any suspended load is added; it makes the bike sit higher or lower
rebound
controls return rate of spring; the spring and rebound combination is what gives stability
compression
After spring and rebound settings make the bike stable, compression settings control travel over bumps
Adjusters
when major damping elements are unbalanced, fine tuning will not compensate for system problems
The tests are to check spring rates and damping effects. Adjusters are there for adjustments to be made to suit different applications e.g street versus competition.
A setting for solo street riding which works perfectly, gripping in the wet etc, will not suffice when used in a race scenario where late, hard, heavy braking is
called for and quick acceleration out of corners. Much firmer settings are required for race track use; it has to be when you are using the suspension much more
vigorously. A touring bike has to compromise its settings for a variety of road surface irregularities but always on a sealed road. To get a broad range of damping
control we individualise the set-up to the person, bike, and type of riding planned. The broader range means that the overall set-up will be at a slightly less high
level and the adjusters must always be used if you want to achieve the very best compromise for a particular type of riding.
ROAD/RACE set up & tuning
© ProMechA